Monogram Fall Wreath

0
COM
I've seen this type of wreath all over Pinterest lately and it was on my list of "to do's". I've been wanting to add a little bit of fall decor to our home because fall is my all time favorite season!

Here are a few that I used for directions and inspiration.

Link Here


So I really wanted to use a V in the wreath somewhere. Even though for some crazy reason it is super hard to find a V anywhere. They either dont make very many of them or there are a ton of people with the last name starting with a V. :)  I decided that the jute wreath has a fun look for fall. Plus I still have a ton left over to use for another project.


Supplies:
Fall Bundle w/Pumpkin - $2.99 (it was 40% off at Hobby Lobby)
Fall Leaf Stalk - $2.08 (also 40% off at Hobby Lobby)
Simple Wreath - $3.99
Jute Twine - $2.99
Cardboard V - $2.47
Ribbon - $2.39
TOTAL = $16.91
An Awesome Personal Wreath all for under $20
*Plus I have tons of leftover ribbon and twine!
 
 
First I started winding the jute twine vertically and secured it in multiple spots with my hot glue gun. Once you've completed it vertically start on it horizontally. I had a few spots where I wasnt paying very good attention and needed to unwind it, but when I payed attention in the end it turned out great! Once that was completed I wrapped the wreath with ribbon and secured my floral pieces onto the wreath with the twine. The most time consuming part was the V.
 
Final on the door

 
Final inside on my wall
 
Now the only decision to make is where to hang it! I originally wanted it on the door but I almost think I will keep it inside so I can see it more often. :)
 
Thank You Pinterest
-Colby


Learning to Shir

0
COM
Shirring is a new (to me..old to everyone else) technique that is fun and (semi) simple to do! I decided to test it out on a simple cotton floral skirt. I first started with practicing on some scrap fabric because I've never used elastic thread in my bobbin before but have noticed it a ton on some of the dresses I bought at Target over the summer.

First you use a thin piece of elastic thread that you can typically find in the elastic area of your fabric store and not the thread area. Looks like this:


You will have to wrap it by hand around the plastic bobbin and make sure you pull it a little tight and not wrap it to loose. You may have to play around with how tight to wrap it. Believe me I had to redo my thread and a few bad stitches. We all love the trail and error in learning to sew. :)


Scrap piece - This is NOT how it should look


The picture above was a test piece that I first did. The elastic thread was too loose and that is how it will look when its not shirring correctly. I found out that on my Brother sewing machine I needed to tighten the bobbin tension and found the great video on how to do it here. I recommend watching this video if you have a Brother sewing machine.
 
Correct tension! This is how it will look.
After testing the scrap piece and getting a correct tension I started on the floral cotton fabric that I found at Hancock Fabrics.


I serged the edges to give it a finished look.


The above picture shows you how the rows on the left are correct and the last row on the right was incorrect and not shirring properly. I had to re-wind my bobbin with elastic becasue I didnt pull it taught while winding around the bobbin.
 
 
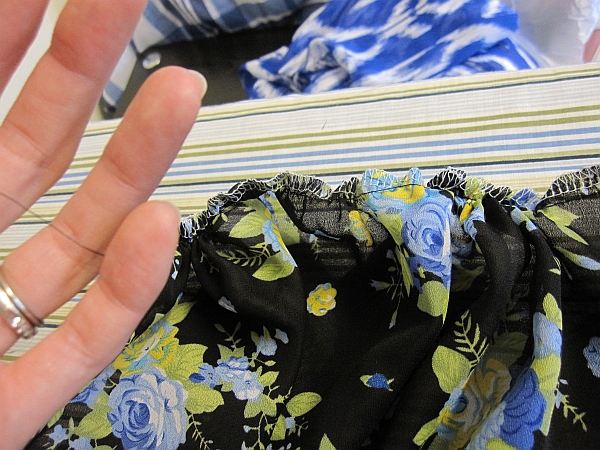
When you start to shir the fabric make sure the fabric is pulled flat while you sew and not getting bunched up under the sewing foot. Sometimes it helps to use both hand pulling the fabric before the foot and after the foot. The picture below shows what it will start to look like when you have a few rows of shirring done. The more rows you shir the tighter it will get.


After five rows of shirring!

Then if you actually want it tighter take your iron and simply give it a little steam and watch the magic while your fabric shrinks up even more! (it looks like 6 rows above but my very top row was my hem stitch. I was going to add a thicker piece of elastic but I liked the final look of it being bunched up at the top).


My final skirt! Its easy to wear and I've actually worn it a few times out already. :) I hope to make a few more of these and I havent been pregnant yet but could imagine this is super great staple piece for pregnant women as well! I will add a finished picture with an outfit soon.

Happy Sewing!
Colby
 

Dolman T-Shirt

0
COM
This was a fun (semi-quick) project that I'm really happy with. I found the original inspiration from this blog here. Recently I found this blog that I love too and she has a great easy version as well here. I've been wanting to branch out from skirts and try something different and out of my comfort zone. I found a great raspberry and cream lace jersey knit fabric at Hancock fabrics a while ago with plans to make a shirt with it.

Fabric

I used parchment paper for to create this pattern

Had to tape on the sleeves since the paper wasn't that wide.

I used parchment paper to create this pattern because we had it lying around the house and we never use it. :) The only thing was I needed to add some extra pieces to the sleeves since the paper wasn't wide enough, but it worked out well to do that. I just found one of my comfortable t-shirts to get the measurements from for the neck, sleeves, etc. Except for this one I wanted it to be a longer length shirt similar to a tunic that you could wear leggings with so I just added some extra length.

Cutting the fabric. I made sure the lines were identical on both sides.

Pinned and ready to sew!

Basted the pieces together.

After I cut the fabric I decided to just baste the shirt together to make sure the size was correct. After I put it on I realized that I needed more room in the buttox (lol) area because it was a little tight. So my idea was to just add a contrasting panel on the bottom half of the shirt. Took a while to get right, but it was fun to do to challenge myself.

Pieces added to the side seams.

Pinned

Sewn and serged!

Then after I added the side pieces I thought it would be fun to add contrasting end panels to the sleeves. I also ended up cutting my sleeve length about 2 inches before adding the new panel.


Measured around sleeve and doubled the size

The piece I cut for the sleeve.

Sew the ends together with right sides together.

Then fold and just slip the sleeve inside and pin.

Pinned.

Sew close to the inside to make sure you grab the sleeve.

Then with the neck I wanted to try doing this (I want to do this someday thought) but that didn't work the way I really planned since this is more of a boat neck style. So I ended up just rolling the hem in a few times and sewing which turned out to be a bit easier.

Measured the neckband for the original idea, but changed my mind.

Rolled hem at neckline.

Finally put the finished product on and I was pretty happy. :) I may make another one of these but easier and without the side panels. I just need to angle out the bottom of the pattern more when I make it next time.


Final  
You can see the side panel I added. Turned out nice!

Fits comfortably!
Sorry for the horrible quality photos. I think I'm going to put a new camera on my Christmas list!
Happy Sewing
-Colby

Consignment Dress Refashioning

0
COM
These projects were fun! Taking something that I found at Target (sadly at regular price, but its awesome see that post here) and at The Loft (a consignment store in Ames). I loved both pieces but had small little tweaks that I wanted to do to them.

Little black dress from The Loft
only $13 (Guess Brand)


It fit really well and I love that it isnt a v-neck top, but still very flattering. As you can see it had white fabric pieces under the bust that were a little worn and discolored. I wanted the dress to look a little more sharp or dressy. I took off the white pieces and the buttons (saved the buttons cause they are in good shape) with a seam ripper which was easy enough. Then I went to JoAnn's and Hobby Lobby looking for a fun gold button to replace the old one.


I found my favorite buttons from Hobby Lobby surprisingly and had a hard time deciding on a small all gold button and a bigger gold/black button. I chose the bigger button since it had big buttons on it previously.

Another view of my 2 button options

Final!
The final look! It was fun changing the little details on this dress because now it feels more like a simple yet classy black dress instead of a "teen" looking black dress. I've already worn it and its super comfortable. I may use the top of this dress as a pattern for other tops because it fits so well. The other great thing about updating the buttons is that in a few years if I want to change it again I can just remove the buttons!

Happy Refashioning! :)
Colby

Target Maxi Dress Refashioning

0
COM
I purchased this dress from Target with the intention to fix it up. I bought a medium which was a little bigger at the top but had the length that I loved! The size small was pretty tight and not as long. So even though I bought it at full price I know that it will be a piece that I will wear again and again!

Before Target Dress

Before
As you can see the top was a little baggy in the front and back. It also had a halter top and I really like regular straps. So I measured the straps and sewed them to the back. I also took it in an inch on both sides to tighten the back so it wasn't loose.

Measured distance between my bra straps and mirrored that

Took it in an inch on both sides
Afterwards it fit MUCH better and I felt very comfortable with the new straps. With the regular straps it looks more like a normal black dress instead of a casual beach dress.

Final
Final
The other thing I recommend to EVERYONE no matter what size you are is to purchase a pair of Super Higher Power Spanx!! They make a huge difference and really help you feel more beautiful. It just pulls you in and smooths all our lovely curves particularly in the belly and butt area. It also helps you feel comfortable in your own skin no matter what your size. I think everyone that owns a maxi dress should own a pair of Spanx. If you live in Ames go buy them from Pure Bridal!

Final with Spanx

Final with Spanx
Since my dress is black its kind of hard to see but I felt amazing and super secure! If you need more persuasion check out the video here of before and afters. Its amazing the difference!

Happy Refashioning!
Colby

Simple Elastic Waistband Skirt

0
COM
Even though my title says "simple" this was my first elastic waistband skirt so I took my time and of course made a few little mistakes, but overall I'm pretty happy with the finished results!! I found the idea from a really cute blog here.

Material from Hancock Fabrics & black knit elastic
A detailed view of the fabric

You will want enough elastic to go around your waist. Measure around your waist and add about an inch for the seam allowance. Don't be afraid to pull the measuring tape tight around your waist. I measured to big and had to take in the elastic just a little. Remember that it will stretch so you can make it smaller. You don't want the skirt to be too loose.

Measure how long you need your elastic
Sew the elastic together and backstitch at both ends
Sew down each side to the band with a zig-zag type stitch
The finished band will look like this

Since I made the band too big I cut at the other side and did the same steps as above. It worked out for me to have two reference points on the sides later on.

Reference for each side

Then I cut the fabric. Which I hate the MOST about sewing. Love the sewing part and despise the cutting because I am not the best at making sure everything is perfect and equal. Since this skirt gets gathered at the top if you are off just a little with cutting you cant really tell. :) I made my skirt 17" long from the bottom of the elastic to above my knees and the skirt was a total of 84" wide. When you fold your fabric you can measure out 42" then you have one long piece that becomes 84". I had to fold the fabric differently and then cut the two pieces separately which ended up giving me two side seams instead of one. (hopefully that makes sense - or refer to the blog I found this from here cause she explains it better).

Serged the ends to look more professional & avoid unraveling
My side seams looked like this

Then my next step is probably backwards from most sewing projects. I went ahead and rolled the hem up since I have one long and easy piece of fabric to maneuver. You can also do this as your final step if you want to put it on and double check the length but I was pretty confident it was okay.

Rolled and pressed hem

Once you sew the sides together you have one large piece of fabric. This is when you will gather the top of your fabric. If you have a serger you can gather it that way, but I used the basic method of making a long basting stitch (don't backstitch the ends). Then you pull on one side of the string to gather the fabric. Even out the gathering as you pull.

Pulling on one side of the string to gather. You can do this at both ends
You can see the gathering all around

Pin the elastic to the skirt and that will also help you see where you need to alter or fix the gathering to make it the same width as your elastic.

Pinned to the waistband

Then you will sew the skirt to the waistband. The best way to do it is sewing from the "right" side of the elastic. That way you can be sure you sew a straight line all the way around. Sew two lines so that you know that skirt is secure to the band.

Right side of the skirt - pull pins as you go
Helps you keep a straight line and sew another line closer in

I love this skirt and I could see myself making another with a more cotton (easy to sew with) fabric. This fabric was a polyester/silk/chiffon type fabric. Here is the finished skirt!


Thanks for checking out my blog!
-Colby