I Am A Mother
·

After 2 months it has officially hit me that I am a Mother.
The feeling swept over me as I was facing a dilemma that I’m sure most mothers with newborns face: to wake their sleeping baby or not. I had put Claire down for a nap probably too close to her bedtime and I was thinking, “Do I just let her sleep or do I wake her and continue our routine”. I was staring at this beautiful sleeping child with the most precious face and tears started to stream down my face. I was thinking to myself, “I finally believe that this is real”, “This is MY precious daughter”, and “I am beyond thankful to be her mother”. I could truly feel those feelings that mothers talk about or that you read in books and see in movies.


To be honest when she was born, of course I loved her and cherished her right away, but it didn’t feel real. I still felt like the same person that I was before I gave birth, except now I no longer had a flat tummy and had a couple new scars on my body. I know that this was the child that we fought so hard for after many years of unknown reasons for infertility and finally deciding on pursuing the path of IVF. We even have a picture of her as an embryo which is so crazy.
Floating through those first few weeks and even the first few months after her birth I didn’t feel any different. I didn’t have some mothering lightning bolt hit me like I thought it would. They say that the bond between a mother and child is amazing, but it felt like a dream to me, like I was in some alternate reality with a newborn that wasn’t really mine.
I believe that before every major life event like marriage or having a child, we have these extremely high expectations. That our lives will look picturesque, our marriage will be perfect, and that we will be the best parents. It truly is amazing how we don't honestly understand the new phase of our lives until we are actually in it. You can give someone the best advice before they get there, but your advice wont actually sink in until they live through it.


I know that being a mom will have its good days and hard days, but that indescribable feeling of what it means to be MOM will never leave. After 2 months I now know what it feels like to be a mother and it has sunk into the deepest parts of my soul. I’m a mother and will forever be one.
Claire is the precious human that God has entrusted me to love, cherish, and provide for. This will forever be my life and words can’t express the amazing feeling within me.

Chevron Pallet Thread Holder
·
Here are a few of the inspirations I found on other blogs while trying to come up with ideas.
(Click on the blog text to check them out)
 |
| Sugar Bee Blog |
 |
| The Creative Homemaker |
| Craptastic Katie |

I found in our town that the local college has a wood junk pile that anyone can take pallets or tree remnants to and its all FREE!! This was pallet heaven so my wonderful husband helped me choose the best one for this project.

Once we removed the back part of the pallet we saved the smaller wood strips (from the back) and screwed them into the front pieces to make it secure. I then sanded the wood and stained it. After the stain I put multiple coats of polyurethane to make it shine! We had the stain and shine cans from a previous wood project so that was awesome.

Now comes the hard part...seriously...it was WAY harder to figure out how I wanted the chevron to look. I've seen blogs and posts talking about making a square and then marking your chevron from that, but this was a little harder because I wanted the chevron to go across 2 boards for a bigger look and all of the boards are close but not perfectly the same. So I just taped together a bunch of printer paper and started marking out my measurements with the help of my smart husband since math is not my strongest area. :) Then cut out the chevron and used painters tape to mark it in place.

I've seen a few really cool sewing rooms that have gold accent pieces so I was really excited to choose the color gold for my chevron! I bought some spray paint from Lowes for only $5 and went to town on my pallet. It was a wonderful day outside so it took less than an hour for each chevron to dry.

Here it is with all the chevrons and I was really happy with the results!

Then with painters tape I marked out where I wanted the nails to go. I purchased 3" nails from Lowes for $2. I wanted a longer nail so that I still had a long enough space for my thread and a bobbin to go either on top or underneath.

Final product and I love it!
It will hold 54 spools of thread and if I really want to I could add more nails to the top and bottom row, but I figured I don't have enough thread to fill it out now so that will be down the line if I need it. Right now its just leaning against the wall but in the future we can definitely hang it once we live in a house that I can have a sewing room in. :)

From start to finish! Coming in at under $10 what a bargain!
-Colby
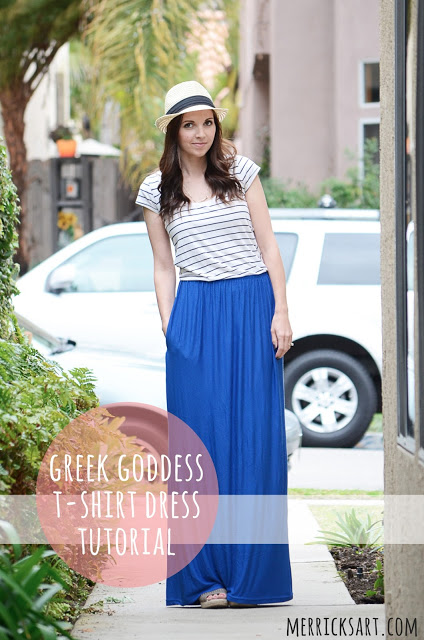
T-Shirt Maxi Dress
·
Recently I came across a tutorial on one of my favorite bloggers websites. She created a t-shirt maxi dress. So essentially its a t-shirt from your closet attached to a maxi skirt. In my case I had a favorite white Gap t-shirt that had some small stain at the bottom of the hem which was perfect for this dress! Then I had a large amount of black knit jersey material that I had purchased a while ago at the last sale from JoAnn Fabric.
 |
| Click on the picture for her tutorial |
Here are the simple steps:
1. Choose your t-shirt you want to use. I would suggest one that isn't super fitted. Then cut the shirt 3 or 4 inches from the hem or even more depending on how long your shirt is. I just put the shirt on me and put a pin a few inches below where I wanted the skirt to sit.
2. Cut the jersey material. I used the exact measurements from MerricsArt tutorial, but it ended up being to long for me so I had to trim a few inches off before hemming So just measure the length from your waist to your feet then add a few inches for the hems. Also you don't have to but I also made POCKETS for this skirt!! Check out the pocket tutorial here. It rocks and its another great blog that I follow!!
.jpg)
3. Once you have it cut sew the pieces together or I HIGHLY recommend serging the skirt together if you have access to one.
4. Sew the t-shirt to the skirt. I had to gather my skirt a little bit first (by sewing a long stitch and pulling) because it was wider than the base of my t-shirt. Then sew another stitch a little bit away from your first stitch so that you have room to insert the elastic band. Be sure to leave a space somewhere so you can insert the elastic.
5. Insert the elastic band into the skirt slot (between the stitches that you just created). I used a similar size to the one she used in her tutorial. I wrapped the elastic around my waist and then pulled it tight (not too tight) so that I could feel how tight it would be on me. Then you cut it to that length, put a pin in one of the ends and feed it through. Once its all the way fed through you sew the ends together and close the hole between your stitches.
**Step 5 is probably the part that I would change. If I create another one of these I would make the skirt with the elastic band, then once I have that I would sew the t-shirt to the skirt.**
6. Hem the skirt and you are DONE!
Here is my final product. Super comfortable and awesome.

One of my biggest pet peeves with maxi skirts is your t-shirt moving or bunching up under your skirt at the waistband...well this dress DOES NOT do that! It rocks.
Until next time
~Colby
Butterick B5526 ~ Chambray Blouse
·
A CHAMBRAY BLOUSE

I used Butterick pattern B5526 and option A. I really enjoyed this project even though I had to rip out a few seams after much trial and error. Cutting the pattern can sometimes be the hardest part. I started out thinking I needed a size 10 based on the pattern sizing instructions, but when I looked at the sizing on the pattern pieces themselves it looked like I needed a 6 so I went back and trimmed the pieces down.

The difficulties for me on this project where the collar stand (not the collar itself), the placket on the sleeve (bottom left pic above), the front pockets and the sleeves....which basically sounds like the whole shirt, lol. :) With my personality I like to create first and then check my work later which does NOT work well with sewing. Like for instance I put the pockets on and measured the distances from the top and side to make them even but I didn't actually see where they would sit on my bust! (See how they are high looking in the pic above) So in the end I had to lower both pockets which left small stitch lines on the shirt.
 |
| Watching Downton Abbey while sewing :) |
I did enjoy this project overall because I've never attempted anything like this and now that I have I could probably work on a shirt like this again which I hope to do in the future. Another tough factor was this type of fabric really doesn't have a right and wrong side so that was a little challenging so maybe next time I will pick something with a clear right and wrong side to help clarify when cutting and sewing the pattern.

I loved my buttons that I picked out, but I'm thinking now that I should have used a thread that matches the button..not sure on that one. I used the button sewing foot on my sewing machine and that was FANTASTIC to sew the buttons on for the first time with a machine and not by hand!

Finished shirt above & below

Just like with anything that you create from scratch whether its a new dinner meal, a house project, or a sewing project YOU are your own worst critic. So in the end we need to learn to enjoy and appreciate our creation even if we feel it has flaws. :)
My sweet husband loves my shirt and I am so thankful for a supportive man.
Until the next project!
Colby
Nexus Tablet Zipper Cover
·
I've seen many pouches, purses, makeup cases, and more just like this on the internet before and have seen some good tutorials out there so I knew it would be an easy attempt! With some leftover chambray fabric from the blouse that I am currently working on (should have the final product blog up soon) and from a skirt I made (the bow on the front) I cut the pieces based on the blog instructions here. I also had some batting from a quilt project I worked on previously and used that to add some cushion.

The only alterations I made from the blog were the size of the pieces. Since my tablet is 5"x8" I added a 5/8" seam allowance (which may have been to big) and then an extra 1/4" just in case I messed something up and made it too small. So my final cutting size was 6.5" by 9.5". I'm SUPER HORRIBLE at math by the way but sewing sure helps me work on my math skills!!
I was originally going to try and add some fun bling from some pearls and jewels I purchased a while back but decided against it since this is my first time. Once this one wears out and I get better at making them then hopefully I can get more creative!
Lastly I had a hard time understanding the final sewing process on the pouch so I had to watch a video to make sure I understood it. I watched this video here. I'm sure there are way better quality videos out there but this was the first one I stumbled upon so I used it. :)
~Final Product~

I am 80% happy with this! Of course as a seamstress (if that's what I would call myself) I am my own worst critic. I forgot to trim the corners and could have sewn the zipper at the top a little better.
I feel like I'm rambling, but its because I've finally completed a project and its been a while so it feels great!
~Colby
Monogram Fall Wreath
·
Here are a few that I used for directions and inspiration.
 |
| Link Here |


So I really wanted to use a V in the wreath somewhere. Even though for some crazy reason it is super hard to find a V anywhere. They either dont make very many of them or there are a ton of people with the last name starting with a V. :) I decided that the jute wreath has a fun look for fall. Plus I still have a ton left over to use for another project.

Supplies:
Fall Bundle w/Pumpkin - $2.99 (it was 40% off at Hobby Lobby)
Fall Leaf Stalk - $2.08 (also 40% off at Hobby Lobby)
Simple Wreath - $3.99
Jute Twine - $2.99
Cardboard V - $2.47
Ribbon - $2.39
TOTAL = $16.91
An Awesome Personal Wreath all for under $20
*Plus I have tons of leftover ribbon and twine!

First I started winding the jute twine vertically and secured it in multiple spots with my hot glue gun. Once you've completed it vertically start on it horizontally. I had a few spots where I wasnt paying very good attention and needed to unwind it, but when I payed attention in the end it turned out great! Once that was completed I wrapped the wreath with ribbon and secured my floral pieces onto the wreath with the twine. The most time consuming part was the V.

Final on the door

Final inside on my wall
Now the only decision to make is where to hang it! I originally wanted it on the door but I almost think I will keep it inside so I can see it more often. :)
Thank You Pinterest
-Colby
Learning to Shir
·
First you use a thin piece of elastic thread that you can typically find in the elastic area of your fabric store and not the thread area. Looks like this:

You will have to wrap it by hand around the plastic bobbin and make sure you pull it a little tight and not wrap it to loose. You may have to play around with how tight to wrap it. Believe me I had to redo my thread and a few bad stitches. We all love the trail and error in learning to sew. :)
 |
| Scrap piece - This is NOT how it should look |
The picture above was a test piece that I first did. The elastic thread was too loose and that is how it will look when its not shirring correctly. I found out that on my Brother sewing machine I needed to tighten the bobbin tension and found the great video on how to do it here. I recommend watching this video if you have a Brother sewing machine.
 |
| Correct tension! This is how it will look. |

I serged the edges to give it a finished look.

The above picture shows you how the rows on the left are correct and the last row on the right was incorrect and not shirring properly. I had to re-wind my bobbin with elastic becasue I didnt pull it taught while winding around the bobbin.

When you start to shir the fabric make sure the fabric is pulled flat while you sew and not getting bunched up under the sewing foot. Sometimes it helps to use both hand pulling the fabric before the foot and after the foot. The picture below shows what it will start to look like when you have a few rows of shirring done. The more rows you shir the tighter it will get.


After five rows of shirring!
Then if you actually want it tighter take your iron and simply give it a little steam and watch the magic while your fabric shrinks up even more! (it looks like 6 rows above but my very top row was my hem stitch. I was going to add a thicker piece of elastic but I liked the final look of it being bunched up at the top).

My final skirt! Its easy to wear and I've actually worn it a few times out already. :) I hope to make a few more of these and I havent been pregnant yet but could imagine this is super great staple piece for pregnant women as well! I will add a finished picture with an outfit soon.
Happy Sewing!
Colby
Subscribe to:
Posts (Atom)


.jpg)


